Hammer Strut Support(TM) for Ruger MK
the One-Time Fix - reassembly aid (patented)
Veteran Owned and Operated. Made in USA.
God Bless America!
Going Out of Business-Retiring-INVENTORY SOLD OUT
Items still available at two retail outlets: see order page.
Check back monthly to see if another company has bought the patent and resumed manufacturing and sales.

Patent available for sale NOW.
Expires in 2035. Serious inquires only. Use contact form.
For Most Ruger MK, Volquartsen Scorpion, and AMT Lightning Pistols


All Videos
Note: press "esc" key to exit full screen video.
Hammer Strut Support(R) (HSS)
Installation-Read First!:
1. Ensure pistol is not loaded.
2. See diagram at right.
3. Remove Mainspring Housing Assembly & hand grip panels.
4. Secure pistol with barrel away from you, with handle down.
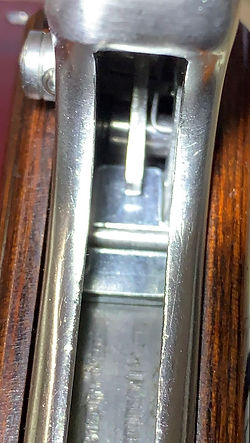
5. CAUTION: Using paper clip, punch, needle nose pliers,or tweezers, etc., slowly slide pistol Lower Cross-Pin (Sear Spring Stop Pin) which is near loose bottom end of pistol Hammer Strut, to left as far as possible without releasing the spring under the left side of Lower Cross-Pin. (as shown in picture)

Installation Video
Note 1:
Some customers with very old pistols report having to use a pin punch and small hammer or wood mallet to nudge cross-pin free to begin.
Note 2:
Recovery procedure if you accidently retract the Lower Cross-Pin too much, releasing the spring. (That spring is held, wrapped around the sear spring post, and it cannot become disoriented or dislodged.)
a. Just push the lower leg of that spring back down, and reinsert the lower cross-pin (from the left side of the pistol) back into its original position over that spring, as it was originally.
b. Then, just finish the install according to the instructions below. You will find normal function checks at the end of the install procedure will prove installation to be okay. (These are the normal checks you would perform after any routine cleaning of your pistol.)
Note 3:
If wrong (upper) pin in handle is removed and the sear spring is accidentally released and falls out of gun:
Sear Spring goes back in:
-
Coil forward
-
Short upper leg in front of the Sear
-
Long straight leg down, and against left wall of open channel (to go under cross-pin)
-
Partially re-install cross-pin (lower pin) from left.
Sear goes in with spring notch on left, and the hole rearward, (lever section forward towards front of barrel.
Then continue to install Hammer Strut Support as normal.

6. Insert HSS into the vacated Mainspring Housing Area in the rear of the handle, below the Lower Cross-Pin. Note that the HSS is slightly wider than the opening, and must be tilted slightly during insertion through the opening. Install HSS flat side first (to front of pistol and flush to frame), with HSS
narrow end up as shown:
a. Temporarily lift the bottom (loose end) of the Hammer Strut up out of the way. The upper end of the strut must freely rotate in the hammer, if not: lubricate pivot point.
b. Carefully slide HSS upward along frame to align HSS cross-slot with the Lower Cross-Pin, and with the HSS upper narrow end between pistol’s springs on the left and right side.
7. Push Lower Cross-Pin to right, through the HSS cross-slot and back to its original position, flush with pistol handle exterior. (picture shows Lower Cross-Pin pushed half way back to right.)

8. Reinstall pistol hand grips.
Always function check pistol, including the safety function, twice.
Hammer strut can never again get caught under cross-pin!
Hammer Strut in proper position to begin reassembly:
not touching cross-pin!


REASSEMBLY from now on (same as normal factory reassembly):
A. With the SAFETY OFF and barrel downward, ensure hammer fired (fully forward): MK III pistols require mag to be inserted to move hammer fully forward. Pull and hold trigger, and physically push hammer forward, using toothpick, etc.
B. Barrel still downward, reinstall Mainspring Housing, pushing plunger up through Bolt into pistol Receiver.
C. Be sure the hammer is still fully forward: the hammer strut (floppy thing) not touching the cross-pin, but about 1/4 inch above it.
D. With barrel rotated upward 30-45 degrees, press Mainspring Housing into handle. You should notice a “springy” feeling prior to latching.
-----------------------------------------------------------------------------------------------------------------
TROUBLESHOOTING PROBLEMS:
IF YOU CANNOT PUSH THE MAINSPRING HOUSING ASSEMBLY COMPLETELY BACK INTO THE HANDLE, there are two main reasons:
1. The hammer is not in the “fired”/fully forward position. Remember, the safety must be in the off position for the entire re-installation. (Some older pistols with loose hammer pivot pins, tend to allow the hammer to move on its own when reorienting the pistol.) Remove the Mainspring Housing Assembly and go back to step A above. The new Hammer Strut Support has just prevented you from improperly installing the Mainspring Housing Assembly and has just saved you from having a MAJOR problem!!!!
1a. If you have a government target or competition model: the hammers on these pistols rotate extremely smoothly on their hammer pivot pin, allowing the hammer to rotate to the "cocked/rearward" position on it's own, rather than staying in the "fired/forward" position during mainspring reassembly. For these models you must recheck that the hammer stays fully forward, after rotating the barrel upwards during reassembly.
1b. If the cross-pin was retracted too far to the left, and the lower leg of the sear spring was accidentally released and not re-installed under the cross-pin, then the hammer can fall rearward when you tip up the barrel, and the mainspring assembly cannot be pushed completely back into the handle, giving the indication that the new Hammer Strut Support is too thick. This sometimes leaves an indentation on the Hammer Strut Support. Remove the Hammer Strut Support and re-install the cross-pin and with the sear spring leg below it as it should be, and then re-install the Hammer Strut Support as per instructions.
2. The plunger (of the mainspring assembly) is not completely pushed up thru the bolt and receiver. The plunger should protrude about 3/8 inch through and above the receiver (behind the rear sight). If the plunger is not all the way up, then the bottom of the mainspring assembly is too low and will not go into the bottom of the handle opening for it.
-----------------------------------------------------------------------------------------------------------------
IF THE BOLT CANNOT BE PULLED BACK THERE ARE TWO POSSIBILITIES:
NOTE. The safety must be in the off (down) position for the entire re-installation.
If the mainspring assembly fits back into the handle, and you were able to lock it down, then the new Hammer Strut Support is not too thick, but does truly fit okay.
POSSIBILITY #1: IF THE BOLT CANNOT BE PULLED BACK, but mainspring assembly can be removed.
If you did not feel the "springiness" just prior to fully pushing the mainspring assembly into the handle, this indicates two things.
1. The Hammer Strut did not mate with the hammer spring inside the hammer spring assembly.
2. And, the new Hammer Strut Support just saved you from having a MAJOR PROBLEM of not working and not being able to unlock the latch.
Whenever the bolt cannot be pulled back, the hammer is jammed forward against the bolt, keeping it from being pulled back. This is always because the hammer strut did not mate with the hammer spring, and the strut got jammed above the mainspring assembly.
This is always because the barrel was not tipped up before pressing the mainspring assembly back into the handle, with 2 exceptions:
1. On some government and target and competition and some very used pistols, the hammer rotates on its own when the barrel is tipped up or down, and you must ensure the hammer stays in the fired/forward position.
2. A VERY FEW pistols needed a little oil on the upper pivot of the hammer strut, since the strut would not swing/move freely on the hammer.
If you pushed the mainspring housing latch closed with the barrel still pointed down, it will usually lock the bolt up. In accordance with factory assembly instructions, be sure to point the barrel up 30-45 degrees just prior to pushing the mainspring assembly into the handle. This allows the loose end of the hammer strut to fall (by gravity) into proper alignment with the mainspring housing receptacle for it. You should always feel a slight "springy" feeling just prior to the mainspring housing becoming fully inserted back into the handle. This shows you that the hammer strut is properly engaging the hammer spring. Then close the latch. This has nothing to do with the new Hammer Strut Support but is a part of the normal required Ruger assembly procedure.
If that does not resolve the problem, try lowering or removing the magazine. If the bolt has been removed (e.g.: for cleaning), the magazine sometimes jams against the bolt, causing the bolt to become jammed during the re-installation process. Again, this has nothing to do with the new Hammer Strut Support, but sometimes this catches people by surprise.
-----------------------------------------------------------------------------------------------------------------
POSSIBILITY #2: IF THE BOLT CANNOT BE PULLED BACK MORE THAN ½ INCH, AND MAINSPRING ASSEMBLY WILL ONLY PULL OUT ABOUT 1 INCH, AND TAKES STRONG EFFORT TO PUSH BACK INTO HANDLE.
Note: The safety must be in the off (down) position for the entire re-installation.
Then the hammer is still in “cocked/rearward” position, and needs to be “fired/moved forward” to release pressure on mainspring.
-
First, ensure safety is off, (magazine installed for MK III).
-
Then pull bolt back to cock pistol (when safety is off, bolt should pull back).
-
Then pull trigger to fire pistol which will release pressure on mainspring and allow mainspring assembly to be removed easily.
-
Then re-install mainspring assembly into pistol per normal instructions.
----------------------------------------------------------------------------------------------------------------------
IF THE MAINSPRING PLUNGER IS PULLING OUT WHEN YOU TRY TO PUSH/ROTATE THE MAINSPRING HOUSING BACK INTO THE HANDLE:
The hammer strut is jamming against the "crook" part of the mainspring assembly.
-
Take mainspring out.
-
Hold barrel forward (away from you) and slightly down.
-
Magazine in; Safety off (down); pull and hold trigger;
-
Push hammer (the block of metal attached to top end of hammer strut) fully forward with pencil, etc., while still holding trigger "pulled".
-
Bottom of hammer strut should be about 3/8 inch above the cross-pin, but still touching the upper surface of the new Hammer Strut Support (HSS).
-
Hold gun in this position while inserting the plunger of the mainspring assembly up through the bolt and receiver. It should protrude about 1/8 inch.
-
Rotate barrel slowly upward to about 45 degrees above horizontal. The hammer strut should hand down (by gravity) freely toward the ground.
Slowly press mainspring assembly into handle. The last 1/8 inch you should (must) feel a springy feeling. That tells you the hammer strut is mated to the hammer spring.
Always function check pistol, including the safety function, twice.
To download printer friendly file without pictures, select PDF file button to begin download:
ADDITIONAL INFORMATION, UNRELATED TO HAMMER STRUT:
IF IT IS VERY DIFFICULT TO INSERT THE MAINSPRING PLUNGER THROUGH THE BOLT AND RECEIVER, OR TO REMOVE IT FROM THERE:
The problem is the way the recoil rod assembly (which sits on top of the bolt) was manufactured by Ruger.
The aft end of the stock Ruger recoil rod extends into the hole/open area where the plunger will have to pass through.
This has nothing to do with the Hammer Strut Support.
A solution to this difficulty is to replace the Ruger recoil rod assembly with a machined and threaded assembly manufactured by Volquartsen, which does not block the opening:
VOLQUARTSEN VC3RS RECOIL ROD AND SPRING KIT FOR RUGER MARK I, II, III, IV, AND 22/45
The end of the recoil assembly manufactured by Ruger is shown on the left and Volquartsen item is shown on the right.

We do not sell this this replacement recoil rod assembly, but it is available for purchase at:
https://volquartsen.com/inventory_configurations/1086
or
or
Important Note: Any modification of your firearm may void the warranty of the manufacturer. No liability is expressed or implied for damage or injury as a result of improper installation or use of this product.